It’s better when you make your own beef stock at home

Photo by Cynthia Hochswender

About five years ago the world decided that bone broth was a magical elixir that could help cure our most serious afflictions (which at that time mostly seemed to amount to wrinkles and joint pain).
Well, the world is a different place now and we have different health priorities, but of course wrinkles and joint pain continue to plague many of the world’s inhabitants.
The sad truth is that bone broth doesn’t actually help with those superficial but still annoying ills, at least according to the Harvard Health website. And oddly, there doesn’t seem to be any research that supports bone broth as a healthy part of your diet; and yet, it seems impossible that it wouldn’t be good for you.
If nothing else, there is at minimum something to be said for having hot, satisfying homemade food in the cold winter months.
Holiday kitchen wish list
In a sense, this is also a last-minute holiday shopping story, because making bone broth (or beef stock, as it is also known) involves my four most beloved kitchen tools, all available in a range of price points both online and at area big box stores. Any chef who doesn’t have these yet will deeply appreciate a small digital scale (the Escali Primo is reliable and easy to operate) at about $25; a digital thermometer (the Lavatools Javelin used to be cheaper but is now $26 and extraordinarily helpful); a really good knife (for Christmas I received and am already using a Victorinox bread knife, which I use on everything including meat); and a large Instantpot, which I scoffed at originally but which I now use almost daily. Since you’re probably reading this on Christmas Day or after, think about obtaining these if you end up making an exchange somewhere and have credits to use up.
Why bother?
If you’re going to go to the trouble to make beef stew or short ribs or a thick enriching winter soup, you need a good stock at the base, to make it richer and tastier and more unctuous — and healthier — even if for no other reason than that it will have no preservatives and probably less salt than packaged stock.
Stock is expensive and takes a long time, but it’s worth the effort. And if you have an Instantpot, the time is much shorter and your stock will be much richer. The two basic reasons are that steam doesn’t escape an Instantpot; and supposedly the broth doesn’t boil as hard and get agitated and cloudy.
The best bones to buy
The recipe for this stock is online at www.kitchn.com, and it also provides directions on how to make stock without an Instantpot. I made three versions of this stock and found that I like to use much less water for a richer, more concentrated broth (which will take less room in my freezer and which has a delightful solid jelly texture).
The basic recipe calls for 2 pounds of beef bones, but I bought about 7 pounds, for $115. I could have been fine with 3 pounds, but you do want to get a good variety. LaBonne’s market in Salisbury had for sale the trifecta of essential stock bones: ox tail, short rib and osso bucco or shank. Sharon Farm Market in Sharon, Conn., also has a large freezer case full of these essential broth bones.
Because I bought twice as many bones as I needed, I now have enough broth to last me for two years. I wanted the mix of different bone types, though; if you want to get all the bones but don’t think you’ll need as much broth, maybe share with a friend.
Roast & boil
Rinse off 3 pounds of bones, pat them dry with a paper towel and then roast them on a foil-lined baking sheet for about 45 minutes at 400 degrees. You can do this a day or two before you make the stock. You can weigh the bones on your handy Escali scale if you can’t figure out the weights from the label on the meat package.
I left the bone on the meat when I roasted it, and after it was done, I sliced off the delicious short rib and osso bucco meat after roasting and before the next step.
Put the bones in the Instantpot with 6 cups of water (use filtered water if your tap water has a mineral or bleach-y or sour taste; your broth is only as good as your water). Add three tablespoons of cider vinegar (or white wine vinegar is fine; it’ll cook off).
Put the Instantpot on “saute” and “high” for 30 minutes. Skim off any foam from the top and wipe it on a paper towel and dispose of it as it cooks. You want a super clear broth with no impurities in it.
Pressure cook for hours
Next, put the lid on and close the steam vent. Set the cooker to pressure cook/high/2 hours. It will take about an hour to reach high pressure, so add that to your 2-hour timetable.
While you’re waiting for the broth to cook and cool, peel two carrots and cut them in half; and peel and quarter one and a half modest-sized onions.
After it completes its two hours, you’ll want to let it come down to pressure naturally; do not try to release the steam or you could end up with a geyser of hot liquid shooting out of the pot at you.
When the pressure release valve drops, add the vegetables, then close up the cooker and set it again to pressure cook/high/2 hours (be sure as always that the vent is closed). When it’s done, again, let the pressure release naturally.
Straining the broth
You’ll want to have a lot of ice ready; and if you have a cold porch, this is the time to use it as a kitchen annex. It’s essential for you to cool off the broth as quickly as possible. You can’t put it in the fridge until the broth is down to about 60 degrees, though, or it will just heat up your refrigerator (yes, this really happens).
Take a large bowl and put in about 2 inches of ice and cold water. Put a large bowl in the ice. Put a mesh strainer in the bowl and add some cheesecloth on top of that (yes, we are fighting hard against impurities).
Do not pour your broth into the bowl. First, gently lift out the bones and veggies and put them in a separate bowl.
Then, gently ladle the stock into your bowl/strainer/cheese cloth. Do not pour it; the weight of the liquid will force impurities through your cheesecloth and your mesh. It’s tedious but, if you’ve come this far already why ruin it in the last steps?
Gently lift the strainer and cheesecloth out of the broth bowl and throw them away. Then stir the thick brown liquid in your bowl. If you can, take the broth bowl and its partner ice bowl and put them in your cold porch. It will now take two or three hours for the broth to come down to about 60 degrees.
Stir the broth every 20 minutes or so. You’ll know it’s ready when you’re able to easily scoop the fat off the top. You can also dip your digital thermometer in the liquid and get an instant readout on the temperature.
Storing it for the winter
Gently pour your broth into a large rectangular storage container or a large bowl that you can cover, and put it in the refrigerator overnight.
In just a few hours, your broth should set to a nice solid wobbly gelatin.
Spoon your gelatin into several small storage containers that you can keep in the freezer until you need them. If it’s really nice and solid, as it should be, you can gently turn your container over onto a cutting board.
If you used a rectangular container you will find it’s easy to cut this broth up into individual slices that you can put in containers and freeze. A 3-inch slice is a good amount for stew for two or three people.
Once the bones have cooled, you can pick the tender beef off the oxtails and make sandwiches with it.
You can also marinate your short ribs and cook them with your new broth — in your Instantpot, if you have one, or in whatever cooking vessel traditionally works best for you.
D.H. Callahan
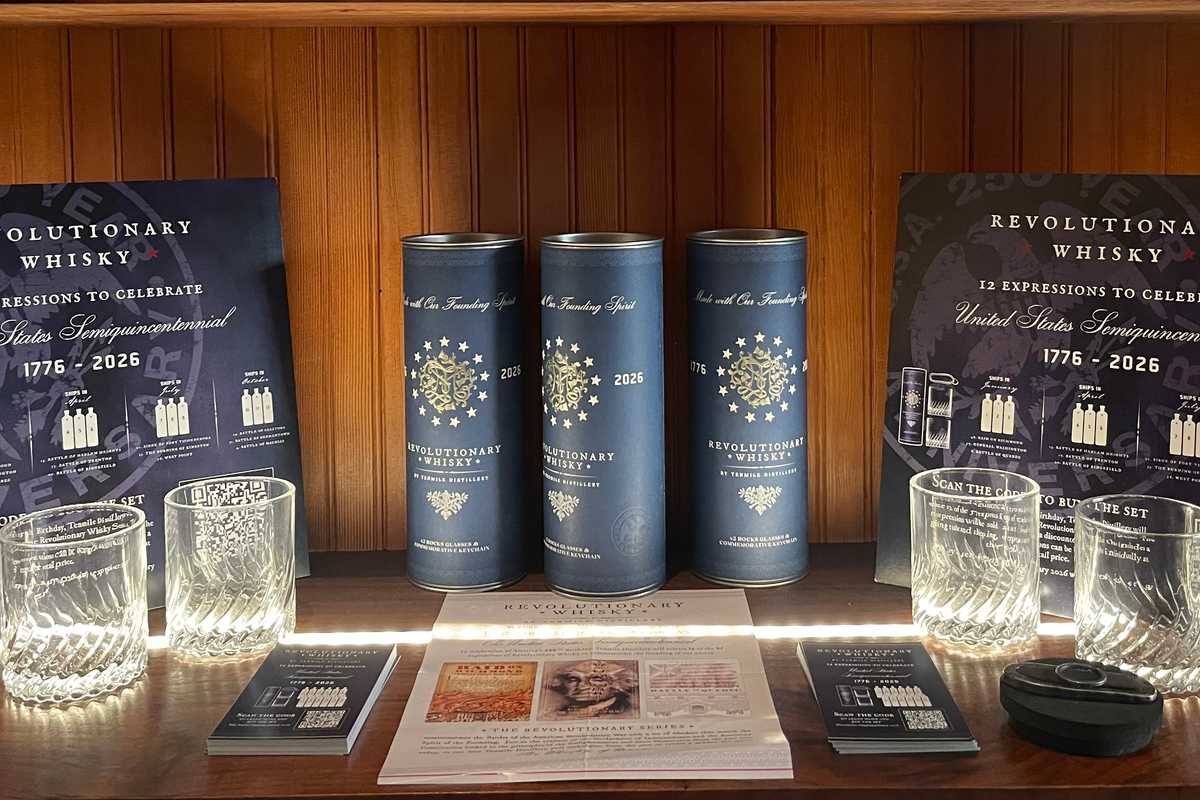
Cheers! The Revolutionary Whisky Series at Ten Mile Distillery, each named for a significant battle of the American Revolution, celebrates America at 250.
In December 2024, the U.S. Alcohol and Tobacco Tax and Trade Bureau officially established the Standard of Identity for American Single Malt Whisky. It was the first new classification in more than half a century, creating new possibilities for American distillers. One of the distilleries taking advantage of this new landscape is Wassaic’s Tenmile Distillery. It is well positioned to make history because Tenmile has always honored traditional whiskey-making practices.
Single malts are often associated with Scotch whisky. Perhaps that’s why, years before the new standard was adopted, Tenmile hired Shane Fraser, a Scottish master distiller with 30 years of experience at some of Scotland’s most prestigious distilleries. Fraser began designing the distillery from the ground up. Alongside owner and general manager Joel LeVangia, he emphasized time-honored traditions, favoring hands-on craftsmanship over the increasingly automated methods used by larger producers. When it comes to making the best whisky possible, Tenmile believes in learning from the past. That philosophy extends beyond the distilling process.
 D.H. Callahan
In late 2025, in anticipation of the 250th anniversary of the signing of the Declaration of Independence, the distillery introduced its Revolutionary Whisky Series. The collection features 57 unique expressions, each with its own combination of barrel types and aging periods, and each named for a significant battle of the American Revolution.
LeVangia sees the series not only as something collectible — a hallmark of the international craft distilling world — but also as an opportunity to educate. Most Americans learn about the Revolution in high school U.S. history classes, but LeVangia wanted to go beyond familiar stories such as Washington crossing the Delaware or the famous command to wait until soldiers could see “the whites of their eyes.” Each bottle helps tell a deeper story.
To bring those stories to life, Tenmile has gone the extra — dare they say, 11th — mile. Tom Bouldin, Ph.D., serves as the distillery’s historian. He consults on the series, helping LeVangia and Fraser connect each expression to an appropriate battle of the American Revolution. He also leads Tenmile’s lecture series. While some of Bouldin’s talks explore the history of popular music, his primary focus is the battles of the American Revolution.
With each new release, Tenmile hosts an intimate evening of history and whisky tasting. Centered on Bouldin’s meticulously researched lectures, the events often spark broader conversations about the battles, the people who fought them and what those events still mean today. It’s a style of promotion rarely seen today. Although the distillery and its grounds are stunning, these gatherings are not designed as Instagram photo opportunities. Instead, they bring together a small group of people eager to learn from the past while tasting something new.
That is what the Revolutionary Whisky Series — and Tenmile Distillery as a whole — is all about: learning from history while forging its own.
D.H. Callahan
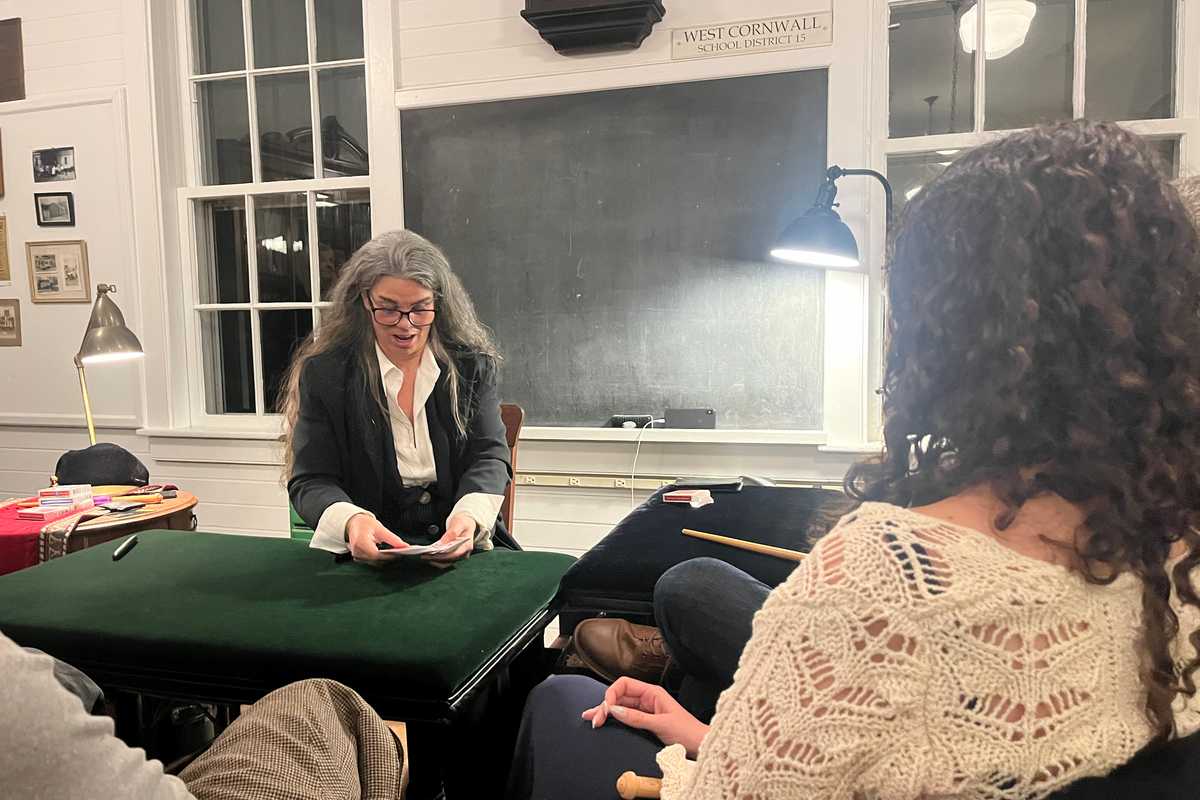
Belinda Sinclair
Sinclair’s show explores the ways women have been practicing forms of magic for centuries, and there is plenty of history to tell.
Belinda Sinclair is the kind of magician who impresses people who don’t like magic. Her tricks are mind-boggling. Her stories are captivating. And if she picks you to write your name on a card, get ready to be wowed. Repeat attendees of her shows, of which there are many, take almost as much delight in watching new jaws drop as they do in seeing an illusion reach its astonishing conclusion.
Since the summer of 2025, Sinclair has been baffling local audiences at the Hughes Memorial Library in West Cornwall, but her magical run comes to a close at the end of August.
For 45 years, Sinclair, a New York City native, has been hosting small, intimate performances in the “Conjuring Room,” her Victorian parlor in Hell’s Kitchen. It’s a place made for magic, with built-in surprises designed to disorient. But the Hughes Library doesn’t have the same potential to perplex. The room is, as the name suggests, a library, with shelves packed tightly with old books. Some of those books, stocked by Sinclair herself, dive into the history of women and magic. That particular topic is the organizing principle of her show.
Today, we live in a world with large-scale magic productions from household names like David Blaine. Penn & Teller and Criss Angel had widely popular television series, while performers like magician and comedian Justin Willman have found audiences on Netflix. David Copperfield, the most commercially successful magician in history, only recently had his 25-year Las Vegas residency cancelled, after allegations connected to the Jeffrey Epstein investigation resurfaced. But very few women, arguably none, have reached the highest levels of fame in the magic world.
Sinclair’s show explores the ways women have been practicing forms of magic for centuries, and there is plenty of history to tell. Her head is simply full of historical anecdotes and interpretations. She seems to know everything there is to know about magic and how, over the centuries, it has been feared and misunderstood.
It’s knowledge she acquired through decades in the world of magic. Sinclair got her start by accident. After graduating from New York City’s High School of Performing Arts, she was hired to entertain a long business conference as a clown. Despite having no clowning experience, she did so well that she was hired for a party on the spot where she was expected to perform magic. She didn’t know a single trick. So she headed to Tannen’s, the legendary Manhattan magic shop that is still open to this day, and asked them to teach her.
She was so captivated by the first trick she learned that she soon began illustrating the shop’s newsletter, the “Trickune.” Soon, she had worked her way into the world of magic. But her trajectory seemed limited. Women in magic were, and frequently still are, relegated to the role of “lovely assistant,” and Sinclair was no exception. She played along, laughing at the bad jokes and flirting with the right men, all the while knowing she could perform better than most of them.
Soon, she stopped playing along. She started developing her own routines. She became increasingly proficient with a deck of cards. She practiced and practiced and practiced. Eventually, the magic establishment took notice of this young magician with the audacity to be a woman.
As her reputation grew, so did the challenges she faced. Breaking into the inner circles of magic is no easy task, but Sinclair knew that if she wanted to be taken seriously, she needed to impress the people at the top. The Magic Circle, a prestigious British society whose members have included Penn & Teller, Stephen Fry and King Charles III, evaluates prospective members through a rigorous performance examination that includes required tricks. Sinclair earned a perfect score of 100 out of 100, proving not only that a woman could perform magic, but that she could perform it as well, if not better, than anyone.
As remarkable as her skills are, there’s a lot more to Sinclair than magic. She’s a ceramicist, hypnotherapist, author, game creator, actor and coder. But perhaps most importantly, she’s a teacher.
Sinclair thrives on helping others navigate through whatever obstacles life throws their way. For a time, that meant helping military veterans with PTSD transition to civilian life. She teaches children how to code so they can build their own websites. She works with unhoused children, using magic to boost their confidence. But if she has her way, the most important lesson she can teach is that with the right amount of work and determination, anyone — and especially little girls — can do the impossible.
Richard Feiner And Annette Stover
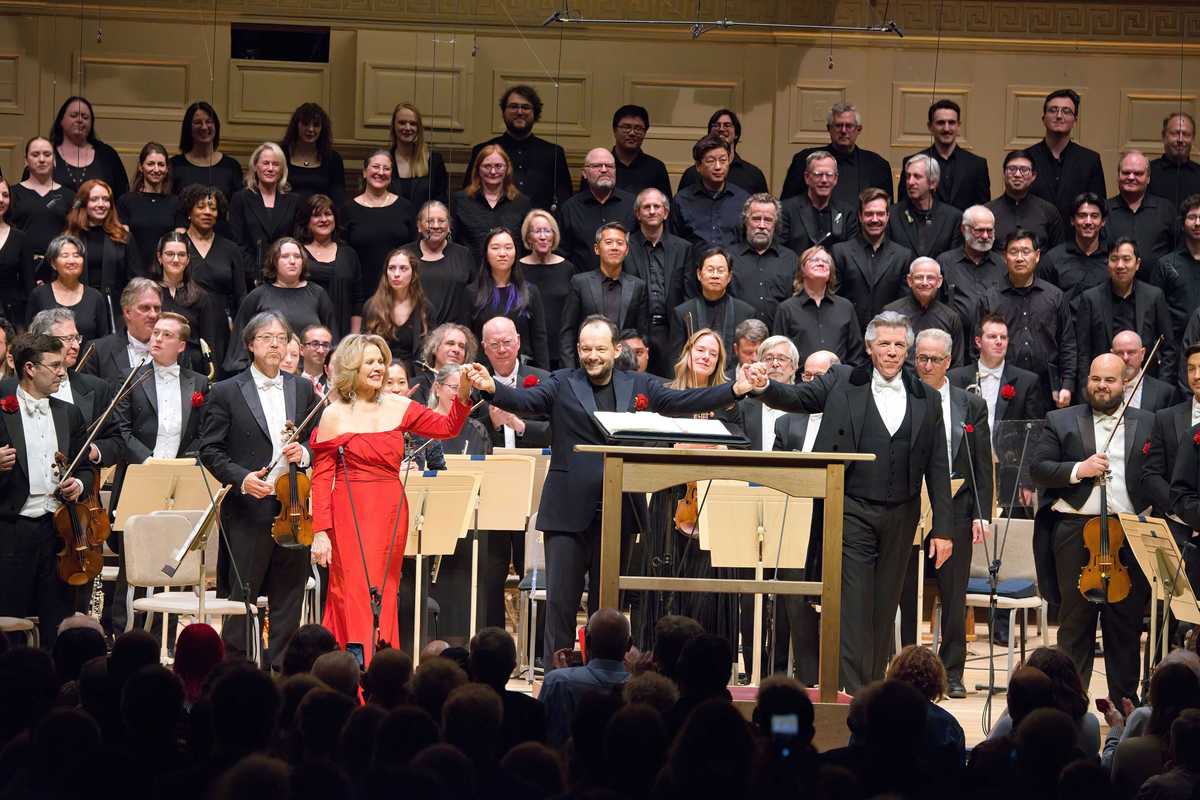
Renée Fleming, Andris Nelsons and Thomas Hampson.
On Friday, July 17 at 8 p.m. in the Koussevitzky Music Shed at Tanglewood, two of the greatest American voices of their generation, soprano Renée Fleming and baritone Thomas Hampson, join Music Director Andris Nelsons and the Boston Symphony Orchestra in a performance of excerpts from John Adams’ groundbreaking opera “Nixon in China.” The piece, performed earlier this year in Boston and at Carnegie Hall in New York City, is a highlight of a program that also includes “Meditations on Grace” (2024) by BSO Composer Chair Carlos Simon, and the melodic and technically demanding Violin Concerto by Samuel Barber.
Fleming is internationally celebrated for her vocal and dramatic artistry, as well as for her advocacy for the powerful impact of the creative arts in health. Hampson has long been recognized as one of the most innovative musicians of our time and has received countless international honors for his singular artistry and cultural leadership. Both performed in “Nixon in China” earlier this year at the Paris Opera under the baton of Kent Nagano.
Adams’ “Three Scenes from Nixon in China” is a suite taken from the opera and prepared especially for the BSO performances with Fleming and Hampson in the roles of Pat and Richard Nixon. The suite includes Act I, Scene I, in which the Nixons arrive in Beijing; Pat Nixon’s “This is prophetic” aria from Act II, Scene I; and Nixon’s speech followed by a chorus of toasts and cheers (“Gam bei!”) in Act I, Scene III.
The full opera premiered in 1987 and has become one of the most celebrated works of contemporary American music. As The New Yorker wrote, “Not since ‘Porgy and Bess’ has an American opera won such universal acclaim as ‘Nixon in China.’”
The libretto is based on Nixon’s groundbreaking February 1972 visit to reestablish diplomatic ties with the People’s Republic of China. The production was controversial at the time: an opera about a recent American president whose resignation was still vivid in the country’s memory. Created by a first-time opera composer, a poet new to opera (Alice Goodman) and a young avant-garde director (Peter Sellars), the piece defied expectations of what a contemporary opera could be.
Yet “Nixon in China” has proved to be something far more than a provocation; it has been hailed as helping to revitalize American opera. It uses realistic scenarios based on recent historical events to make direct statements about big social questions, especially the status of women in history and society. It is also credited with helping to create the subgenre of the “headline opera,” works that refract the mythology of recent real-life events and personalities through the lens of operatic music, words and staging.
Adams’ score is a dazzling fusion of rhythmic vitality and luminous choral textures with the psychological intricacy of character drama. It reflects the composer’s ongoing search, as he has put it, to find “the sacred in the everyday.” The result is a distinctive kind of music theater that transforms historical and contemporary narratives into modern parables in order to explore the tension between public facade and private reckoning, and between human motive and moral choice.
This Tanglewood concert promises to be a highlight of the summer’s music season. It is part of the BSO’s E Pluribus Unum festival, a multiyear celebration that shines a spotlight on American music to explore the country’s history and ideals and to raise critical questions on topics that shape our collective experience.
For more information and to purchase tickets, visit bso.org.

Want more of our stories on Google? Click here to make us a Preferred Source.
Jack Sheedy
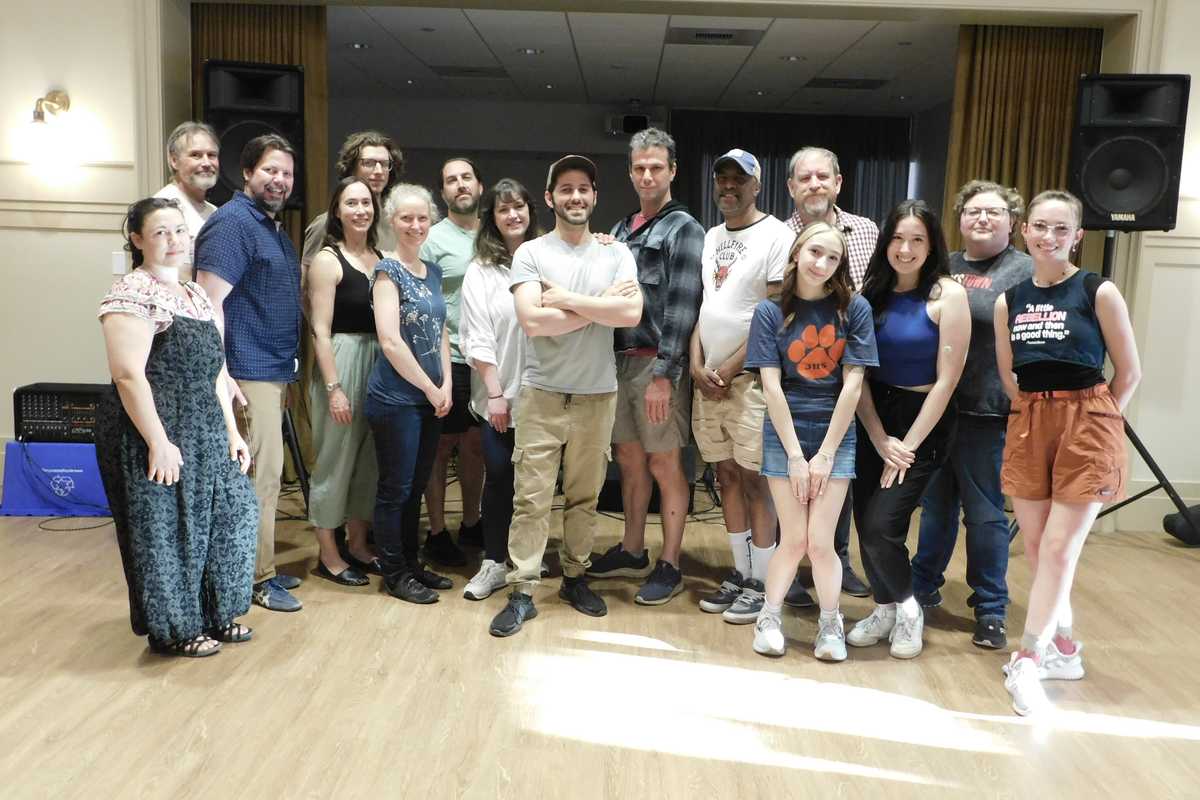
The cast and crew of “Rebeltown: The Musical.”
John Alan Segalla was working in Boston a few years ago, giving historic tours at the site of the Boston Tea Party. Now, as America celebrates 250 years as a nation, the Canaan native is about to debut a new version of his original musical, “Rebel Town,” inspired largely by the Boston Tea Party, the protest that helped launch the American Revolution.
“It wasn’t until I got to Boston and learned the Tea Party story that I fell in love with this moment in history, and I saw the story as wildly compelling and very important, and really a story that was very misunderstood, mistaught in schools,” Segalla said at a recent rehearsal in Stockbridge, Massachusetts, ahead of the show’s July 10 opening.
Segalla wrote most of the script during 2020, hoping to produce it by 2023, the Tea Party’s 250th anniversary. He finally mounted a version of the show in Stockbridge in 2024. It ran a bit long, he said, so the current iteration is more compact, running well under two hours.
The musical focuses on the lives of carpenter William Grey (played by Segalla), his wife Sarah Grey (Emma Robertson) and apprentice Peter Slater Jr. (Ryleigh Fillio), with appearances by historical figures such as Paul Revere (Chris Vecchia), Samuel Adams (Ryan Mascilak) and John Hancock (Christopher Boswell).
The action follows the clandestine meetings of the Sons of Liberty as they plan the bold destruction of British-taxed tea in Boston Harbor, culminating in Paul Revere’s storied ride, featuring a mechanical horse designed by technical director Ronald Piazza. According to the show’s website, “As rebellion turns to revolution, the cost becomes deeply personal: families are torn apart, loyalties tested, and the line between heroism and sacrifice begins to blur.”
The show is directed by Actors’ Equity member Michael Siktberg, who has worked at Bucks County Playhouse, Sharon Playhouse, the Ogunquit Theatre among and other venues during the past 20 years. He said, “I originally agreed to do this because of John, because of my love and respect for him and our growing friendship.”
He said he sees parallels between events of 250 years ago and today, noting “how they echoed the themes of our lives now.”
The participants in the Tea Party thought they would make a difference. “What is fascinating to me,” Skitberg continued, “is that they really tried to do it peacefully, they really tried a statement without bloodshed.”
But it didn’t work. King George III retaliated with the Intolerable Acts, ultimately inspiring the Declaration of Independence and the Revolution.
Rebecca Gardner, assistant stage manager, said the show could be thought of as the “Hamilton” of Boston. “It’s not Hamilton’s Revolutionary War story; it’s not ‘1776’; it’s another story of that era, which hasn’t been told before,” she said.
Emilyn Bona, also an assistant stage manager, said she has known and worked in theater with Segalla since high school. Even though she now lives in Albany, she said she jumped at the chance to work on Segalla’s latest creation.
Segalla is a Dramatists Guild member and holds a Bachelor of Arts degree in Theater from Russell Sage College. He has toured nationally as Jack in “Magic Tree House: Soars with Reading.” He co-authored a farce, “Moral Dilemmas of the Modern Day Vampire,” which was produced Off-Off-Broadway and in New England. He has performed extensively and received numerous awards, including the New Hampshire Theatre Award for Best Supporting Actor in a Drama for his performance as Don Armado in Shakespeare’s “Love’s Labour’s Lost.”
“This is not a musical that’s taking any political side, left or right,” said Segalla. “It’s meant to be a unifier, and it’s meant to be something to educate and to remind people that this moment in history seeded the Declaration.” He said he hopes it will inspire “a renewed sense of pride in the earliest American values of what we wanted to be, a renewed sense of spirit in what we could become: that shining city on a hill.”
“Rebel Town: The Musical” runs July 10 through 19 at the Kathleen E. McDermott Auditorium, Monument Mountain Regional High School, Great Barrington, Massachusetts. For tickets and more information, go to www.rebeltownthemusical.com.
Natalia Zukerman

Community mural design by Macayla Muzzulin will be painted by volunteers on July 11 in Franklin Plaza in Torrington.
From 10 a.m. to 4 p.m. on Saturday, July 11, Five Points Arts in Torrington will host a community mural project celebrating the nation’s 250th anniversary. Volunteers of every age and artistic ability are invited to help paint a 20-by-6-foot mural designed by artist Macayla Muzzulin. The mural will be completed in one day, transformed from a numbered outline into a permanent public artwork along the river in downtown Torrington.
“We firmly believe art is for everyone,” said Five Points founder and executive director, Judith McElhone. “It’s so great to be able to do this with such talent, and with Launchpad artists, volunteers and staff there to help.”
A recent graduate of the Hartford Art School, Muzzulin is one of Five Points’ Launchpad artists, an initiative that provides shared studio space and professional support to emerging artists. About two dozen artists work from studios above the downtown gallery, where they have access to facilities, mentorship and a creative community.
Muzzulin’s connection to Five Points began long before she became a professional artist.
“She’s been with us since she was 14 years old as a volunteer,” said McElhone. “I knew her skill level and that she would be perfect for this.”
Muzzulin has not created a finished color rendering of the mural. Instead, participants will be working from her numbered design, matching paint colors to corresponding sections. Like many community murals, the artwork will emerge through collective effort rather than individual authorship.
Five Points has expanded steadily over the years. What began as a 740-square-foot summer storefront gallery through the Torrington Arts and Culture Commission’s temporary Art Space Torrington initiative in 2012 has evolved into one of Connecticut’s leading contemporary arts organizations. Today, the nonprofit includes a gallery that has exhibited nearly 1,800 artists and an Arts Center that provides studios, exhibition space and educational programing. This community mural continues that evolution by bringing art beyond the gallery walls and into the heart of downtown, further cementing Five Points’ role in Torrington’s cultural revival.
The project is sponsored by The City of Torrington, Neag Foundation, Jerry’s Artarama in West Hartford and the NWCT Arts Council. For more information, visit fivepointsarts.org.By Natalia Zukerman
From 10 a.m. to 4 p.m. on Saturday, July 11, Five Points Arts in Torrington will host a community mural project celebrating the nation’s 250th anniversary. Volunteers of every age and artistic ability are invited to help paint a 20-by-6-foot mural designed by artist Macayla Muzzulin. The mural will be completed in one day, transformed from a numbered outline into a permanent public artwork along the river in downtown Torrington.
“We firmly believe art is for everyone,” said Five Points founder and executive director, Judith McElhone. “It’s so great to be able to do this with such talent, and with Launchpad artists, volunteers and staff there to help.”
A recent graduate of the Hartford Art School, Muzzulin is one of Five Points’ Launchpad artists, an initiative that provides shared studio space and professional support to emerging artists. About two dozen artists work from studios above the downtown gallery, where they have access to facilities, mentorship and a creative community.
Muzzulin’s connection to Five Points began long before she became a professional artist.
“She’s been with us since she was 14 years old as a volunteer,” said McElhone. “I knew her skill level and that she would be perfect for this.”
Muzzulin has not created a finished color rendering of the mural. Instead, participants will be working from her numbered design, matching paint colors to corresponding sections. Like many community murals, the artwork will emerge through collective effort rather than individual authorship.
Five Points has expanded steadily over the years. What began as a 740-square-foot summer storefront gallery through the Torrington Arts and Culture Commission’s temporary Art Space Torrington initiative in 2012 has evolved into one of Connecticut’s leading contemporary arts organizations. Today, the nonprofit includes a gallery that has exhibited nearly 1,800 artists and an Arts Center that provides studios, exhibition space and educational programing. This community mural continues that evolution by bringing art beyond the gallery walls and into the heart of downtown, further cementing Five Points’ role in Torrington’s cultural revival.
The project is sponsored by The City of Torrington, Neag Foundation, Jerry’s Artarama in West Hartford and the NWCT Arts Council. For more information, visit fivepointsarts.org.
Lucia Iandolo

Gridley Chapel at The Wassaic Project.
The Wassaic Project will host its first musical act of the season at the Gridley Chapel on Saturday, July 11. The event is free and was made possible with funding from a grant from the New York State Council on the Arts.
Officially opening in October, the Chapel will come alive with the sounds of sinonó, a trio featuring vocalist and composer isabel crespo pardo, cellist Lester St. Louis and bassist Henry Fraser. The group draws on Latin American folk and classical chamber music to create what it calls “poemsongs.”
NYSCA is a state agency that provides funding for artistic projects through grants, including the Support for Artists grant opportunity.
Kasssandra Gonzalez, development and communications assistant at the Wassaic Project, said the program allows the organization to support artists in their current and future projects.
“We really care about supporting artists and sustaining artistic practices,” Gonzalez said. “A big part of that, which no one likes to talk about, is having enough funds to make projects possible.”
The Wassaic Project has received this grant since 2022 to support artists in New York state who are part of its program and need funding for future projects. The grant includes nearly $10,000 in direct support for artists’ creative work and allows the organization to present programming it might not otherwise be able to offer, including the July 11 performance.
Gonzalez said there is a common misconception that accessible arts programming is available only in New York City, and the Wassaic Project continues working to make art available to everyone in the community.
“Wassaic Project continues to be a force for good and remains very focused on community,” Gonzalez said. “The idea behind the suggested donation, and making sure that everything is essentially free, is to let people in the area know they can come here and make this their community space.”
The Gridley Chapel is located across the street from Maxon Mills at 37 Furnace Bank Road, Wassaic. Doors open at 7 p.m., and the performance begins at 7:30 p.m. Admission is free, and guests can RSVP at wassaicproject.org
Want more of our stories on Google? Click here to make us a Preferred Source.
Want more of our stories on Google? Click here to make us a Preferred Source.